


Creating rings, ...playing with resin
- Julie Miller
- Aug 2, 2018
- 4 min read


I've always loved the idea of having images, small pieces of art with you at all times, in the form of jewelry. It's something I've wanted to experiment with lately. In the past, I've made pendants using glass microscope slides and sandwiching images between then, then soldering the sides, as you would with stained glass. Some pieces I saw recently had beautiful vintage images in them underneath glass (or crystal?) faceted cabochons. I fell madly in love with them but wanted to create my own version. Having taken a few metal smithing courses, this would be my first choice of fabrication, but having the set up to do this would be obscenely expensive right now. Some day I'd love to, but for now these ring blanks do the job just perfectly!
What resin to use? I did a bunch of research and found that almost all resins yellow with time, and that very few remained clear. This was really important to me, as I also wanted to find a resin to use to coat small paintings to give them that vintage, thick, smooth varnished look. I went back and forth—do I want to coat my paintings in resin? It's not removable so your painting is forever sealed under a layer of plastic. There will be no restoring in the future, no cleaning, etc. Yet, really... it shouldn't ever be necessary now! The painting's surface will be protected, the resin doesn't yellow and is easily cleaned, even scratches can be buffed out with sand paper and polishing cloths. So which resin?
After a while of researching I kept seeing Art Resin pop up on google searches for "non-yellowing artists resin." I purchased a small starter kit and am so very glad I did. It's not cheap, especially if you intend to use it on large paintings! But it's really, really beautiful to work with. Oh also, don't try to use this on canvases, unless it's canvas adhered to some kind of rigid substrate, like masonite? I prefer to paint on gessoed board and this works great.
SO, here was my first wee painting experiment with Art Resin— a 6x6" ring tailed lemur with a party hat, called simply, "Party Hat." :) The first image is PRE-resin. You can see the texture of the paint on the surface. The next photo is just after pouring on the gorgeously clear resin (it's a 1:1 mix... simple to remember!)

When little air bubbles rose to the surface, they mostly popped all on their own. A few were a bit stubborn, so I used my little butane artist torch just near the surface, swiping over the entire painting which easily popped all remaining bubbles! I couldn't believe how simple it was! Then it was a matter of removing drips as they formed on the sides and underneath. Oh also, having an old house with uneven floors, the TRICKIEST part for me was getting my little painting level. This is crucial as the resin is liquid and will self-level. If your piece isn't sitting flat, it will all run towards the low side.
After about 30 min of removing drips with a gloved finger, it seemed stable enough to leave alone, so I covered it and tried not to peek again (you want to keep it covered till fully cured so no dust (or in my case DOG hairs) settle on it!)
Here it is after fully cured. It looks "milky" only because of the glare I had coming in from the windows in my studio. It's perfectly clear, and all colors look gorgeously vibrant!


So this was my experiment, and I was feeling like I didn't like the super shiny surface, it was just a bit too shiny for me. SO, I got out my finest steel wool and finest sand paper and buffed up the surface. THIS is something to do when you've read the info on the Art Resin site. The finest sand paper I had was 400 and the finest steel wool was 000. This is nowhere near fine enough to not leave tiny surface scratches. So I had to get even finer paper.

Eventually I got the surface to a point that looked good to me. Then I did a final buffing with Renaissance Wax, which when buffed out with a soft T-shirt left a gorgeous eggshell sheen, no more super shiny.

Here you can see the final sheen I achieved!

This painting as of today is still available in my website shop! You can find him here!
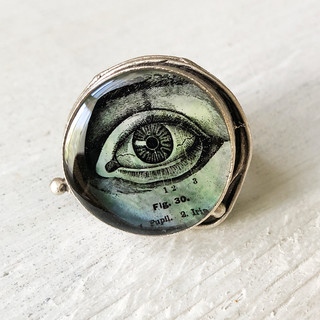
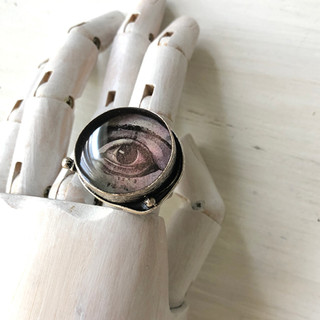
OH WAIT, this post was about the rings! Well, I was so excited to make my rings I took ZERO process photos. But the process is the same (minus the sanding/polishing). They were so much fun to do! I guess my goal now is to get a minimal silversmithing set up so I can make my own blanks. Each step of that process is a big piece of equipment. I don't know, maybe this will fulfill my resin ring urge for now. OK here are some of the final rings. A few are still available in my shop here.


PHEW that was a long blog post. If you stayed with me this long you must be as crazy as I am. Thank you, and give this resin a try! SO much fun!! AND I love the results!


Comments